unityで、初期の頃のマリオ風のシンプルアクションゲーム2Dを作ってみたいと思います。
プレイヤーが左右の矢印キーで操作できますし、スペースキーを押すとジャンプできるようになっています。
今回の主な学習のテーマは「リジッドボディとジャンプ」になります。 前回、横スクロール型のアクションゲームを作りました。 あのときはスペースキーを押したらいつでもジャンプできるようになったわけですが 今回は、地面に着地している時はジャンプができる。 空中に浮いている時はジャンプができない、というふうに 条件分岐をしてあげる必要があります。 プレイヤーが地面と着地している時、 空中に浮いてる時、というのはプログラムでどういう風に書くのか。 そして、その時のリジッドボディの扱い方、みたいなのを勉強して アクションゲームの基礎を勉強していきたいと思います。
動画
コード
▼PlayerScript
using System.Collections;
using System.Collections.Generic;
using UnityEngine;

public class PlayerScript : MonoBehaviour
{
    //1)Rigidbodyが扱える変数を用意
    private Rigidbody2D rb;
    private bool isGrounded; //3)地面に接しているかどうかの正誤判定
    public GameObject goalTextObj; // 8) GoalText UIを扱える変数用意

    // Start is called before the first frame update
    void Start()
    {
        //1)Rigidbodyを取得して代入
        rb = GetComponent<Rigidbody2D>();

    }

    // Update is called once per frame
    void Update()
    {
        //2)左右移動
        float moveX = Input.GetAxis("Horizontal");
        rb.velocity = new Vector2(moveX * 5f, rb.velocity.y);
        //ジャンプ中でも上下の速度(rb.velocity.y)はそのまま保持されるので、空中でも左右に動けます。

        //4)スペースキーを押して、かつ地面に接していたらジャンプ
        if (Input.GetKeyDown(KeyCode.Space) && isGrounded)
        {
            rb.velocity = new Vector2(rb.velocity.x, 10f);
            //今の横方向のスピードは保持したまま、上方向に10。
        }
    }

    // 5)地面との判定
    private void OnCollisionEnter2D(Collision2D collision)
    {
        if (collision.gameObject.CompareTag("GroundTag"))
        {
            isGrounded = true; //地面と接している
        }

        //6)敵と当たったら
        if (collision.gameObject.CompareTag("EnemyTag"))
        {
            GetComponent<SpriteRenderer>().color = Color.red;
            Time.timeScale = 0; // ゲームを止める
        }

        //7)ゴールに当たったら
        if (collision.gameObject.CompareTag("GoalTag"))
        {
            GetComponent<SpriteRenderer>().color = Color.yellow;
            Time.timeScale = 0; // ゲームを止める
            //Debug.Log("GOAL!!!");

            //9)Goal!! を表示
            goalTextObj.SetActive(true);
        }
    }

    //離れたら
    private void OnCollisionExit2D(Collision2D collision)
    {
        isGrounded = false; //地面と接していない
    }
}
▼EnemyScript
using System.Collections;
using System.Collections.Generic;
using UnityEngine;

public class EnemyScript : MonoBehaviour
{
    //1)敵の初期位置を保存する変数を用意
    private Vector3 startPos;

    // Start is called before the first frame update
    void Start()
    {
        //2)敵の初期位置を取得
        startPos = transform.position;
    }

    // Update is called once per frame
    void Update()
    {
        //3)ふわふわした動き
        //Mathf.Sin():マスエフ・サイン。時間とともに一定の繰り返す波の動きを作る
        //Mathf.Sin(Time.time * 移動速度) * 移動距離;
        float fuwafuwa = Mathf.Sin(Time.time * 2f) * 3f;
        transform.position = new Vector3(startPos.x, startPos.y + fuwafuwa, 0f);
    }
}
あらすじ
【ステップ1】基本素材の用意(簡易版)
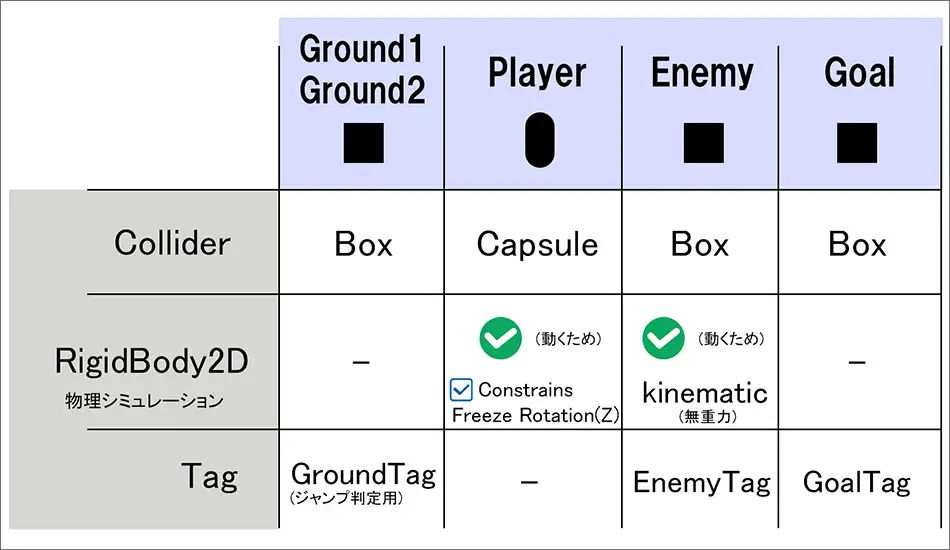
▼Ground1
Pos(-11,-5,0)
Scl(6,1,1)
Box Col
Tagを"GroundTag"に設定(ジャンプ判定用)
▼Ground2
Pos(4,-5,0)
Scl(20,1,1)
Box Col
Tagを"GroundTag"に設定(ジャンプ判定用)
▼Player
Pos(-11,-3.5,0)
Scl(0.7,0.7,0.7)
Rigidbody2D コンポーネント追加(動くため)
▼Enemy
Scl(1,2,1)
BoxCollider2D, Rigidbody2D(Static or Kinematic)追加
Tagを"EnemyTag"に設定
▼Goal
BoxCollider2D
Tagを"GoalTag"に設定
Pos(10,-3,0)
Scl(1,4,1)
【ステップ2】
PlayerScript
▼プレイヤーが転がらないようにする
プレイヤーの Rigidbody2D を選択
インスペクターの中の「Constraints(制約)」を探す
Freeze Rotation > Z にチェックを入れる
【ステップ3】
敵がふわふわ動く
EnemyScript
【ステップ4】
敵に当たったら
【ステップ5】
ゴールに当たったら
【おまけ】
文字を表示
① ゴール表示用のUIを作る⇒最初はオフにする
1)Hierarchy > UI > Text - TextMeshPro を選択
2)名前を GoalText に変更
Pos(0,100,0)
3)
GOAL!!
width 300
Font Size:80
color yellow
インスペクター上部のチェックマークをオフにする