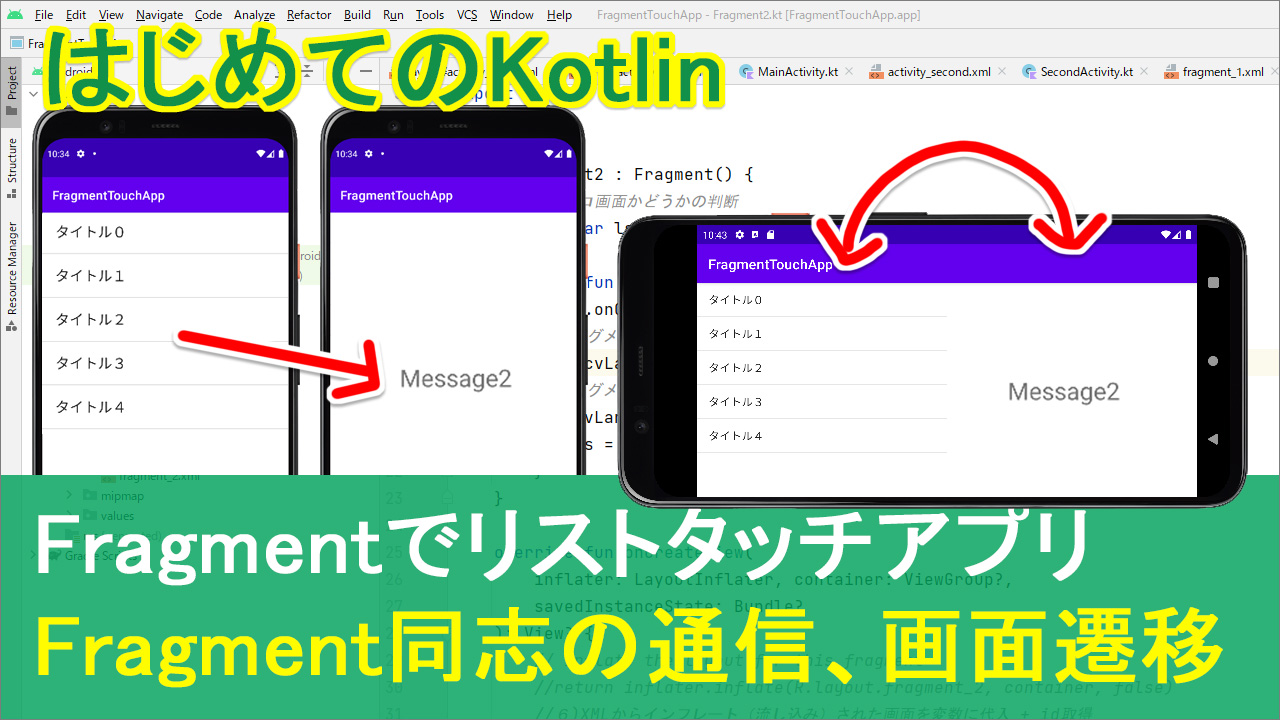
kotlinで、フラグメントに何かしらリストを用意して、
タテ画面の時と、ヨコ画面の時で
表示や操作を使い分ける、というアプリを作ってみたいと思います。
動画
目次
| タイトル | 再生時間 |
| Fragmentのルール | 02:35~ |
| ActivityとFragmentの準備 | 05:00~ |
| FragmentContainerViewを貼り付け | 11:30~ |
| [1]Fragment1にListView | 21:35~ |
| [2]-[5]タイトル配列を用意 | 29:20~ |
| [6][7]Fragment2にメッセージ | 36:45~ |
| [8][9]タッチしたアイテムを取得・渡す | 45:30~ |
| [10][11]値を受け取る、tvに表示 | 50:35~ |
| [12][13]タテ・ヨコの条件分岐 | 55:50~ |
| [14]-[18]ヨコ画面の時データを渡す | 1:00:15~ |
| [19]受け取る側が、ヨコかどうか | 1:12:30~ |
| [20]ヨコ画面で値を受け取る | 1:17:30~ |
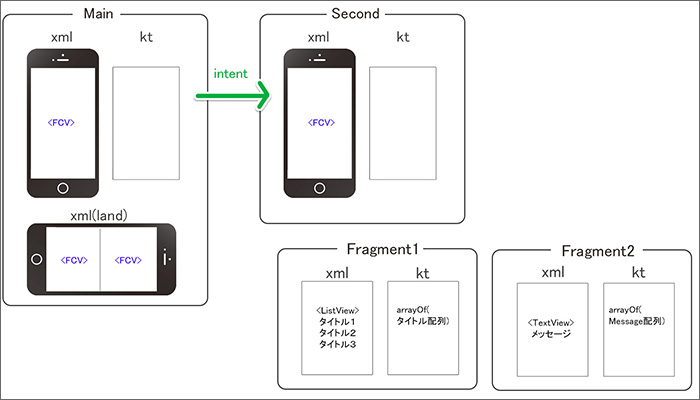
▼今回の全登場人物
コード
▼activity_main.xml
<?xml version="1.0" encoding="utf-8"?>
<androidx.constraintlayout.widget.ConstraintLayout xmlns:android="http://schemas.android.com/apk/res/android"
    xmlns:app="http://schemas.android.com/apk/res-auto"
    xmlns:tools="http://schemas.android.com/tools"
    android:layout_width="match_parent"
    android:layout_height="match_parent"
    tools:context=".MainActivity">

    <androidx.fragment.app.FragmentContainerView
        android:id="@+id/fcvMain"
        android:name="com.example.fragmenttouchapp.Fragment1"
        android:layout_width="match_parent"
        android:layout_height="match_parent" />

</androidx.constraintlayout.widget.ConstraintLayout>
▼activity_main.xml(land)
<?xml version="1.0" encoding="utf-8"?>
<LinearLayout xmlns:android="http://schemas.android.com/apk/res/android"
    xmlns:app="http://schemas.android.com/apk/res-auto"
    xmlns:tools="http://schemas.android.com/tools"
    android:layout_width="match_parent"
    android:layout_height="match_parent"
    android:orientation="horizontal"
    tools:context=".MainActivity">

    <androidx.fragment.app.FragmentContainerView
        android:id="@+id/fcvLand1"
        android:name="com.example.fragmenttouchapp.Fragment1"
        android:layout_width="0dp"
        android:layout_height="match_parent"
        android:layout_weight="1" />

    <androidx.fragment.app.FragmentContainerView
        android:id="@+id/fcvLand2"
        android:name="com.example.fragmenttouchapp.Fragment2"
        android:layout_width="0dp"
        android:layout_height="match_parent"
        android:layout_weight="1" />

</LinearLayout>
▼MainActivity.kt
package com.example.fragmenttouchapp

import androidx.appcompat.app.AppCompatActivity
import android.os.Bundle

class MainActivity : AppCompatActivity() {
    override fun onCreate(savedInstanceState: Bundle?) {
        super.onCreate(savedInstanceState)
        setContentView(R.layout.activity_main)
    }
}
▼activity_second.xml
<?xml version="1.0" encoding="utf-8"?>
<androidx.constraintlayout.widget.ConstraintLayout xmlns:android="http://schemas.android.com/apk/res/android"
    xmlns:app="http://schemas.android.com/apk/res-auto"
    xmlns:tools="http://schemas.android.com/tools"
    android:layout_width="match_parent"
    android:layout_height="match_parent"
    tools:context=".SecondActivity">

    <androidx.fragment.app.FragmentContainerView
        android:id="@+id/fcvSecond"
        android:name="com.example.fragmenttouchapp.Fragment2"
        android:layout_width="match_parent"
        android:layout_height="match_parent" />

</androidx.constraintlayout.widget.ConstraintLayout>
▼SecondActivity.kt
package com.example.fragmenttouchapp

import androidx.appcompat.app.AppCompatActivity
import android.os.Bundle

class SecondActivity : AppCompatActivity() {
    override fun onCreate(savedInstanceState: Bundle?) {
        super.onCreate(savedInstanceState)
        setContentView(R.layout.activity_second)
    }
}
▼fragment_1.xml
<?xml version="1.0" encoding="utf-8"?>
<androidx.constraintlayout.widget.ConstraintLayout xmlns:android="http://schemas.android.com/apk/res/android"
    xmlns:tools="http://schemas.android.com/tools"
    android:layout_width="match_parent"
    android:layout_height="match_parent"
    tools:context=".Fragment1">

    <ListView
        android:id="@+id/lv"
        android:layout_width="match_parent"
        android:layout_height="match_parent"
        tools:layout_editor_absoluteX="1dp"
        tools:layout_editor_absoluteY="1dp" />

</androidx.constraintlayout.widget.ConstraintLayout>
▼Fragment1.kt
package com.example.fragmenttouchapp

import android.content.Intent
import android.os.Bundle
import androidx.fragment.app.Fragment
import android.view.LayoutInflater
import android.view.View
import android.view.ViewGroup
import android.widget.ArrayAdapter
import android.widget.ListView


class Fragment1 : Fragment() {

    override fun onCreateView(
        inflater: LayoutInflater, container: ViewGroup?,
        savedInstanceState: Bundle?
    ): View? {
        // Inflate the layout for this fragment
        //return inflater.inflate(R.layout.fragment_1, container, false)
        //1)XMLからインフレート(流し込み)された画面を変数に代入
        val screen1 = inflater.inflate(R.layout.fragment_1, container, false)

        //2)ListViewを取得(idで)
        val lv:ListView =screen1.findViewById(R.id.lv)
        //3)表示させるタイトルを配列で用意
        val arrayTitle = arrayOf("タイトル0","タイトル1","タイトル2","タイトル3","タイトル4")
        //4)アダプター(ArrayAdapter)へ格納
        val adapter = ArrayAdapter(
            requireContext(),
            android.R.layout.simple_list_item_1,
            arrayTitle
        )
        //5)「4」を、ListViewのアダプターにセット
        lv.adapter = adapter
        //12)自分が所属するアクティビティからFragment2を入れ込むidを取得
        val fcvLand2 = requireActivity().findViewById<View>(R.id.fcvLand2)
        //13)fcvLand2が存在しない(null)なら
        if(fcvLand2 == null){
            //通常のタテ画面⇒intentで画面を渡す(8番)
            lv.setOnItemClickListener { _, _, i, _ ->
                //9)intentで画面を渡す、putExtraで値を渡す
                val intent = Intent(requireContext(),SecondActivity::class.java)
                intent.putExtra("POSITION",i)
                startActivity(intent)
            }
        }else{
            //ヨコ画面
            //14)アイテムを押されたら(行番号を取得)
            lv.setOnItemClickListener { _, _, i, _ ->
                //15)渡すデータを梱包するBundleオブジェクトを生成
                val bundle = Bundle()
                //16)Bundle(梱包用の箱)に、渡すデータを入れる(intentでいうputExtra)
                bundle.putInt("POSITION",i)
                //17)渡す先(Fragment2)を生成して、値を格納(データを受け渡す作業)
                val fragment2 = Fragment2()
                fragment2.arguments = bundle
                //18)画面の切り替え処理
                //(値を渡したら)遷移先のフラグメントの画面を切り替えてください
                requireActivity().supportFragmentManager.beginTransaction()
                    .replace(R.id.fcvLand2,fragment2)
                    .commit()

            }
        }
        //8)アイテムを押したら、押した番号を⇒intentで渡す


        //1)ここまでに処理された画面を、戻り値として返す
        return screen1
    }
}
▼fragment_2.xml
<?xml version="1.0" encoding="utf-8"?>
<androidx.constraintlayout.widget.ConstraintLayout xmlns:android="http://schemas.android.com/apk/res/android"
    xmlns:app="http://schemas.android.com/apk/res-auto"
    xmlns:tools="http://schemas.android.com/tools"
    android:layout_width="match_parent"
    android:layout_height="match_parent"
    tools:context=".Fragment2">

    <TextView
        android:id="@+id/tvMessage"
        android:layout_width="wrap_content"
        android:layout_height="wrap_content"
        android:text="TextMessage"
        android:textSize="20sp"
        app:layout_constraintBottom_toBottomOf="parent"
        app:layout_constraintEnd_toEndOf="parent"
        app:layout_constraintStart_toStartOf="parent"
        app:layout_constraintTop_toTopOf="parent" />
</androidx.constraintlayout.widget.ConstraintLayout>
▼Fragment2.kt
package com.example.fragmenttouchapp

import android.os.Bundle
import androidx.fragment.app.Fragment
import android.view.LayoutInflater
import android.view.View
import android.view.ViewGroup
import android.widget.TextView


class Fragment2 : Fragment() {
    //19)ヨコ画面かどうかの判断
    private var ls = true

    override fun onCreate(savedInstanceState: Bundle?) {
        super.onCreate(savedInstanceState)
        //(フラグメントが生成されたら)アクティビティからフラグメント1のidを取得
        val fcvLand1 = requireActivity().findViewById<View>(R.id.fcvLand1)
        //フラグメント1が存在しないなら
        if(fcvLand1 == null){
            ls = false //ヨコ画面ではない(=タテ画面)
        }
    }

    override fun onCreateView(
        inflater: LayoutInflater, container: ViewGroup?,
        savedInstanceState: Bundle?
    ): View? {
        // Inflate the layout for this fragment
        //return inflater.inflate(R.layout.fragment_2, container, false)
        //6)XMLからインフレート(流し込み)された画面を変数に代入 + id取得
        val screen2 = inflater.inflate(R.layout.fragment_2, container, false)
        val tvMessage :TextView = screen2.findViewById(R.id.tvMessage)
        //7)メッセージ配列を用意
        val arrayMessage = arrayOf("Message0","Message1","Message2","Message3","Message4")
        //20)ヨコ画面(ls)の場合、そうじゃない場合
        if(ls){
            //ヨコ画面
            //21)値を受け取る
            val args = requireArguments()
            val argsPosition =args.getInt("POSITION")
            //22)arrayMessage配列の[argsPosition]番目を表示
            tvMessage.text =arrayMessage[argsPosition ]
        }else{
            //相方(fcvLand1)が存在しないならタテ画面
            //9)⇒10)渡された値(タッチされが行番号)を受け取る
            val itemPosition = requireActivity().intent.getIntExtra("POSITION",0)
            //11)配列の[itemPosition]番目をTextViewに表示
            tvMessage.text =arrayMessage[itemPosition]
        }

        //6)ここまでに処理された画面を、戻り値として返す
        return screen2
    }
}
テキスト解説
フラグメントとフラグメントをやり取りする場合のルール
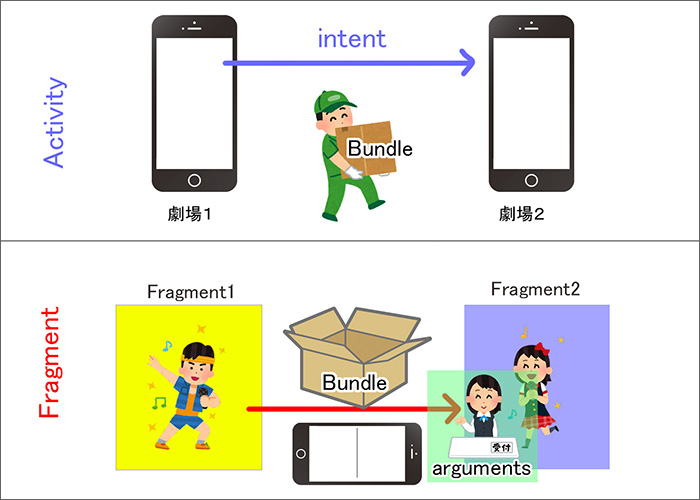
フラグメントとフラグメントをやり取りする場合に、1つ、知っておきたいルールがあります。それは、フラグメント同志は直接やり取りができない、というものです。
どういうことか。
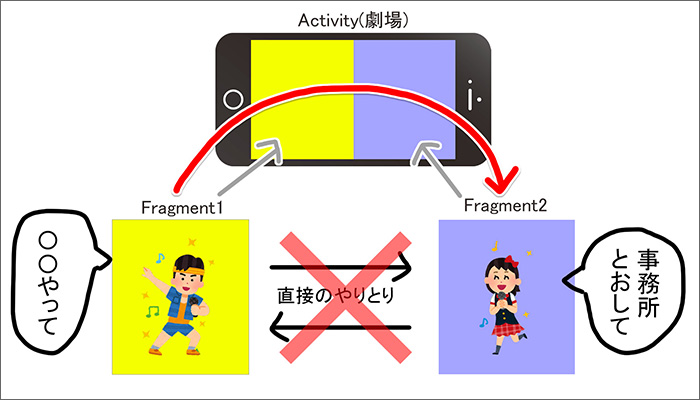
今ここに、ヨコ画面の時のスマホを用意しました。で、今回は、左のフラグメントがタッチされたら、右のフラグメントに反映される、ということですね。
で、フラグメントっていうのは、もともと外部の人ですよね。で、呼ばれた時にだけ、必要な時にだけ、画面に表示される、というものでした。例えて言うなら、フラグメントっていうのは、元々は個々の独立したプレーヤー、タレントさんなんです。
で、アクティビティは劇場。
個々のプレーヤー、タレントさんは、いつも劇場にいるわけじゃなくって劇場からオファーがあった場合にだけ、登場してくれます。これがフラグメント。
で、今言っている、フラグメント同志は直接やりとりができませんっていうのは、タレント同志、直接交渉しちゃいけません、ていうのと同じです。こことここは直接やりとりしちゃいけない。
じゃ、どうするかっていうと、一旦事務所経由、劇場経由で、こちらのフラグメントとやり取りをします。だからこの人が、直接この人に何か指示を出したとします。
そうするとこの人は
「いや、ワシやったってもええけどお前、一回事務所通せよ、と。劇場通せよ」と。なります。
なので、フラグメントで情報を渡す、やり取りをする、という時には、
アクティビティ、劇場を介して、やりとりする必要があります。これがフラグメントを扱う時に大事なルールになりますのでこの概念図をなんとなく頭に入れて、始めていきましょう。
Bundleとargumentsについて
▼動画解説(1:01:43~)
●タテ画面の場合は、
画面(Activity)から画面(Activity)の遷移なので、intentを使います。
(画面を渡すintentの解説はこちら。同じく、値を渡すintent.PutExtraの解説はこちら)
●ヨコ画面の場合は、
同じ画面(Activity)の中で、フラグメント1からフラグメント2へ、値を渡す、受け取る、という
値のやり取りを書いていきます。
ここで今回新しく覚えていただく用語として「Bundle()」っていうのと「arguments」っていうのが出てきます。
Bundleっていうのは「包む」とか「梱包する」って意味なんですけど
大事なデータを渡すときには、Bundleっていうのを使って梱包してあげましょうと。いうことです。
■Bundleとはデータを梱包する箱
ActivityからActivityの時にはintentを使いました。
一方、フラグメントからフラグメントへデータを渡すときにはBundleという梱包用の箱を作って、その中にputIntでデータを入れます。
intentの時はBundleっていうのを使わなかった(記述しなかった)わけですが、なんで?って思いますよね。intentっていうのは実はBundleという作業を既にやってくれています。intentっていうのはアクティビティからアクティビティ、つまり今回の例えて言うと劇場から劇場へのお引越しなんで、引っ越し業者に頼む感じです。なので引っ越し業者は何もしなくても、ちゃんと業者さんがBundleで梱包して、値を渡してくれとったわけなんですよね。
一方フラグメントは、プレーヤーからプレーヤーへの手渡し、みたいなイメージです。
引っ越し業者に頼んでないので、梱包は自分でしましょうね、っていうことでBundleの箱を自前で用意して
その中にデータを入れて、相手に渡す。これが1つ目のルール。
■argumentsというのはデータを受け渡しするときのいわば専門部署
それからもう1つ「arguments」ていう用語が出てきます。直訳すると「口論」とか「議論」っていう意味なんだそうです。ただ、プログラミング的には、そんな攻撃的な意味合いではなくって「指示通りにしてください」っていう意味です。値を受け渡しするときの専門部署みたいなもんだと思ってください。ここへデータを渡すと、指示通りにやってもらえます。
フラグメントもですね、相手へ渡すとき、どこでもいいから適当に渡せばいいんじゃなくって、この人もタレントさんやから、日々色々忙しい。電話対応する人、経理担当する人、みたいな担当が色々、個人事務所の中にも色々役割があるわけですよ。で、データを受け取る部署、みたいなのがあって、そこに渡してください。その名前がarguments、っていうとこですよって話です。
なので、
■データの入った箱。つまりbundleはその中に渡す。
■てことは、受け取り側も、そのargumentsの中から取り出す、みたいな感じになります。
こんな感じの概念図をざっくりひな形にするとこのようになります。
=================================================================
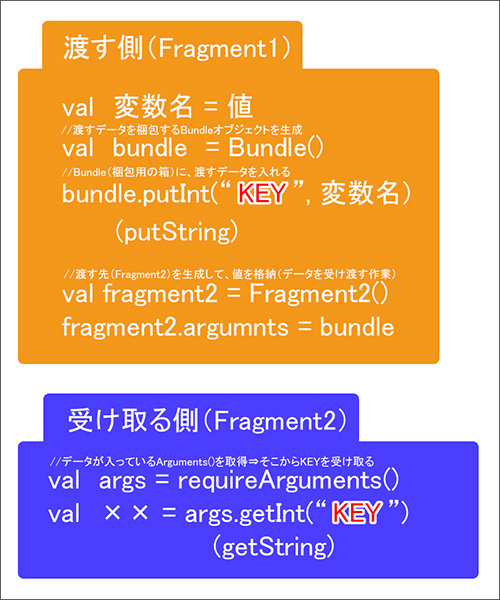
【渡す側】
まず、渡す側は、
何かしら変数、あるいは値が用意できたら
Bundleのハコを用意する。
で、そのBundleにputInt、あるいは文字列ならpurStringでキーと値をセットで格納します。
あとは渡す先のフラグメント、今回でいうとFragment2を取得して
その中のargumentsに、データの入った箱、つまりbundleを入れます。
【受け取る側】
一方、受け取る側は
データを受け取るArgumentsっていう部署を取得して
そこから数字であればgetInt、文字列であればgetStringで、キー受け取ることで
キーに紐づけされた、値の取得が完了する。
という流れになります。
================================================================
まずは渡す方から。こちらは箱を用意する、ということだったのでBundle()を書いていきます。
//15)渡すデータを梱包するBundleオブジェクトを生成
変数名は、まあ、そのままですけど、頭文字が小文字の方でbundle
val bundle = Bundle()
これで今、データを梱包するための箱が出来ました。
変数名は勝手につくったのでなんでもいいですけど、
こっちは本家の方なのでBは大文字なので間違えないようにしてください
で、この中に、渡すデータを入れてあげます。
putIntとしてあげて、キーと値をセットで入れていきます。
intentでいうputExtraですかね。
bundle.putInt()としてあげて、キーはまあ、なんでもいいんですけど上と合わせて
押した場所ということで "POSITION"、
渡す値は i番目なので i
bundle.putInt("POSITION",i)
これで今、箱の中にキーと値が入りました。
*********************************************************
あとは、これを受け渡す、という作業をしてあげるわけですが、ここで、もう1つのキーワード、
arguments っていうのが出てきます。
ひとまず解説は後にして、ktに戻って
//17)渡す先(Fragment2)を生成して、値を格納(データを受け渡す作業)
このように書いてあげてください。
val fragment2 = Fragment2()
この Fragment2() っていうのはもちろん、Fragment2クラスのことです。
で、フラグメント2のargumentsっていうデータ専門の部署に、
データの入ったBundleを渡してあげるということで
fragment2のargumentsに、梱包された箱を代入
val fragment2 = Fragment2()
fragment2.arguments = bundle
これでデータを送り出す作業は完了です。
*********************************************************
あとは、向こうで受け取るという記述を書いたら
データを送る、受け取る、という双方の流れは完成です。
ただ、忘れちゃいけないのが、今は単に渡した、受け取った、
っていう作業だけです。
まあまだ、向こうで受け取るっていう記述は書いてないんですけど
今は作業だけなので、そのやり取りを「画面に反映させる」、「画面が切り替わる」って命令が入っていません。
そこで
//18)画面の切り替え処理
値を渡したら、遷移先のフラグメントの画面を切り替えてくださいっていう命令を書いてあげます。
//(値を渡したら)遷移先のフラグメントの画面を切り替えてください
ここはFragmentManager beginTransaction()
なんちゃらかんちゃら~ってやつなんですけど
supportFragmentManager~ だけだと.beginTransaction()が出てきません。
なので
Activityを要求する、ということで
requireActivity(). としてあげて、supportFragmentManager
こうするとbeginTransaction()が出てくるので、ここからトランザクションを開始していきましょう。
requireActivity().supportFragmentManager.beginTransaction()
あとはリプレイスなんちゃらかんちゃらですね。
requireActivity().supportFragmentManager.beginTransaction()
.replace(R.id.fcvLand2,fragment2)
.commit()
これで値が渡って、画面も切り替わりました。
あとは最後、この値を、つまり「POSITION」をフラグメント2で受け取って、
その内容を表示させてあげれば、完成です。
<参考資料>
FragmentにおけるActivityとContextの使い分け(nullを許容しない → requireContext() / requireActivity())