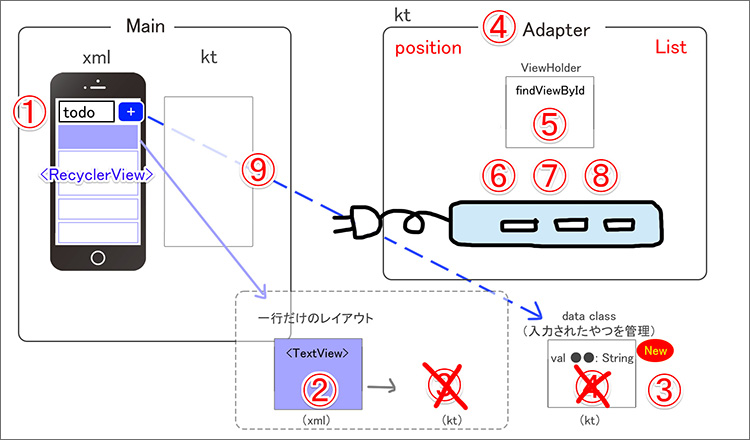
kotlinでRecyclerViewを使って
リストに入力した情報を追加したり、削除したりできる、
簡単なメモ帳アプリというか、Todoアプリのようなものを作ってみたいと思います。
今回は前半で、入力した文字が、リストに追加される、というところまで解説します。
リストからアイテムを削除する方法は後編で解説します。
以下準備中
動画
目次
| タイトル | 再生時間 |
| 作業内容 | 02:25~ |
| [1]activity_main.xml | 07:50~ |
| [2]1行だけのレイアウト(xml) | 15:30~ |
| [3]data class | 18:20~ |
| [4-5]Adapter(準備)と、ViewHolder | 20:45~ |
| [6-8]Adapterの3つ | 29:20~ |
| [9-10]MainActivity.kt | 35:00~ |
| [11]ボタンを押したら~ | 39:00~ |
コード
▼activity_main.xml
<?xml version="1.0" encoding="utf-8"?>
<androidx.constraintlayout.widget.ConstraintLayout xmlns:android="http://schemas.android.com/apk/res/android"
    xmlns:app="http://schemas.android.com/apk/res-auto"
    xmlns:tools="http://schemas.android.com/tools"
    android:layout_width="match_parent"
    android:layout_height="match_parent"
    tools:context=".MainActivity">


    <EditText
        android:id="@+id/et"
        android:layout_width="wrap_content"
        android:layout_height="wrap_content"
        android:layout_marginStart="16dp"
        android:layout_marginTop="16dp"
        android:ems="10"
        android:inputType="textPersonName"
        android:hint="何か書いて"
        android:textSize="24sp"
        app:layout_constraintStart_toStartOf="parent"
        app:layout_constraintTop_toTopOf="parent" />

    <Button
        android:id="@+id/btnAdd"
        android:layout_width="wrap_content"
        android:layout_height="wrap_content"
        android:layout_marginTop="16dp"
        android:layout_marginEnd="16dp"
        android:text="+"
        android:textSize="20sp"
        app:layout_constraintEnd_toEndOf="parent"
        app:layout_constraintTop_toTopOf="parent" />

    <androidx.recyclerview.widget.RecyclerView
        android:id="@+id/rv"
        android:layout_width="0dp"
        android:layout_height="0dp"
        android:layout_marginTop="24dp"
        app:layout_constraintBottom_toBottomOf="parent"
        app:layout_constraintEnd_toEndOf="parent"
        app:layout_constraintStart_toStartOf="parent"
        app:layout_constraintTop_toBottomOf="@+id/et" />
</androidx.constraintlayout.widget.ConstraintLayout>
▼one_layout.xml
<?xml version="1.0" encoding="utf-8"?>
<androidx.constraintlayout.widget.ConstraintLayout xmlns:android="http://schemas.android.com/apk/res/android"
    xmlns:app="http://schemas.android.com/apk/res-auto"
    xmlns:tools="http://schemas.android.com/tools"
    android:layout_width="match_parent"
    android:layout_height="wrap_content">

    <TextView
        android:id="@+id/tv"
        android:layout_width="wrap_content"
        android:layout_height="wrap_content"
        android:layout_marginStart="16dp"
        android:layout_marginTop="16dp"
        android:text="TextView"
        android:textSize="24sp"
        app:layout_constraintStart_toStartOf="parent"
        app:layout_constraintTop_toTopOf="parent" />
</androidx.constraintlayout.widget.ConstraintLayout>
▼TodoData.kt
package com.example.recyclertodo

data class TodoData(
    val myTodo :String
)
▼RecyclerAdapter.kt
package com.example.recyclertodo

import android.view.LayoutInflater
import android.view.View
import android.view.ViewGroup
import android.widget.TextView
import androidx.recyclerview.widget.RecyclerView

//5)リストを用意 クラス名(private val 変数名:ArrayList<データクラス>) //or MutableList
class RecyclerAdapter(private val todoList:ArrayList<TodoData>) :RecyclerView.Adapter<RecyclerAdapter.ViewHolderItem>() {
    //listOf

    //5)ViewHolder(インナークラス)
    inner class ViewHolderItem(v:View) :RecyclerView.ViewHolder(v) {
        val tvHolder : TextView = v.findViewById(R.id.tv)
    }

    //6)一行だけのViewを生成
    override fun onCreateViewHolder(parent: ViewGroup, viewType: Int): ViewHolderItem {
        val itemXml = LayoutInflater.from(parent.context)
            .inflate(R.layout.one_layout,parent,false)
        return ViewHolderItem(itemXml)
    }

    //7)position番目のデータをレイアウト(xml)に表示するようセット
    override fun onBindViewHolder(holder: ViewHolderItem, position: Int) {
        val currentItem = todoList[position] //何番目のリスト(アイテム)ですか
        holder.tvHolder.text = currentItem.myTodo //そのリストの中の要素を指定して代入
    }

    //8)リストサイズ
    override fun getItemCount(): Int {
        return todoList.size
    }
}
▼MainActivity.kt
package com.example.recyclertodo

import androidx.appcompat.app.AppCompatActivity
import android.os.Bundle
import android.widget.Button
import android.widget.EditText
import androidx.recyclerview.widget.LinearLayoutManager
import androidx.recyclerview.widget.RecyclerView

class MainActivity : AppCompatActivity() {
    //9)追加リストと、RecyclerViewと、アダプターを用意
    private var addList =ArrayList<TodoData>() //空っぽのリストを用意<型はデータクラス>
    private lateinit var recyclerView : RecyclerView
    private var recyclerAdapter = RecyclerAdapter(addList) //アダプターに追加リストをセット

    override fun onCreate(savedInstanceState: Bundle?) {
        super.onCreate(savedInstanceState)
        setContentView(R.layout.activity_main)
        //10)viewの取得、アダプターにセット、レイアウトにセット
        recyclerView = findViewById(R.id.rv)
        recyclerView.adapter = recyclerAdapter
        recyclerView.layoutManager = LinearLayoutManager(this)

        //11)追加ボタンを押したら~
        val btnAdd : Button = findViewById(R.id.btnAdd)
        btnAdd.setOnClickListener {
            val et :EditText = findViewById(R.id.et)
            val data =TodoData(et.text.toString())
            addList.add(data)
            recyclerAdapter.notifyItemInserted(addList.lastIndex) //表示を更新(リストの最後に挿入)

            et.text = null
        }
    }
}
【参考】
RecyclerView:アイテムの変更(Change/Insert/Move/Remove)
kotlin android how to add and delete item in recyclerview/android how to add popup menu recyclreview
RecyclerViewの基本的な使い方と動的にリストを作る方法