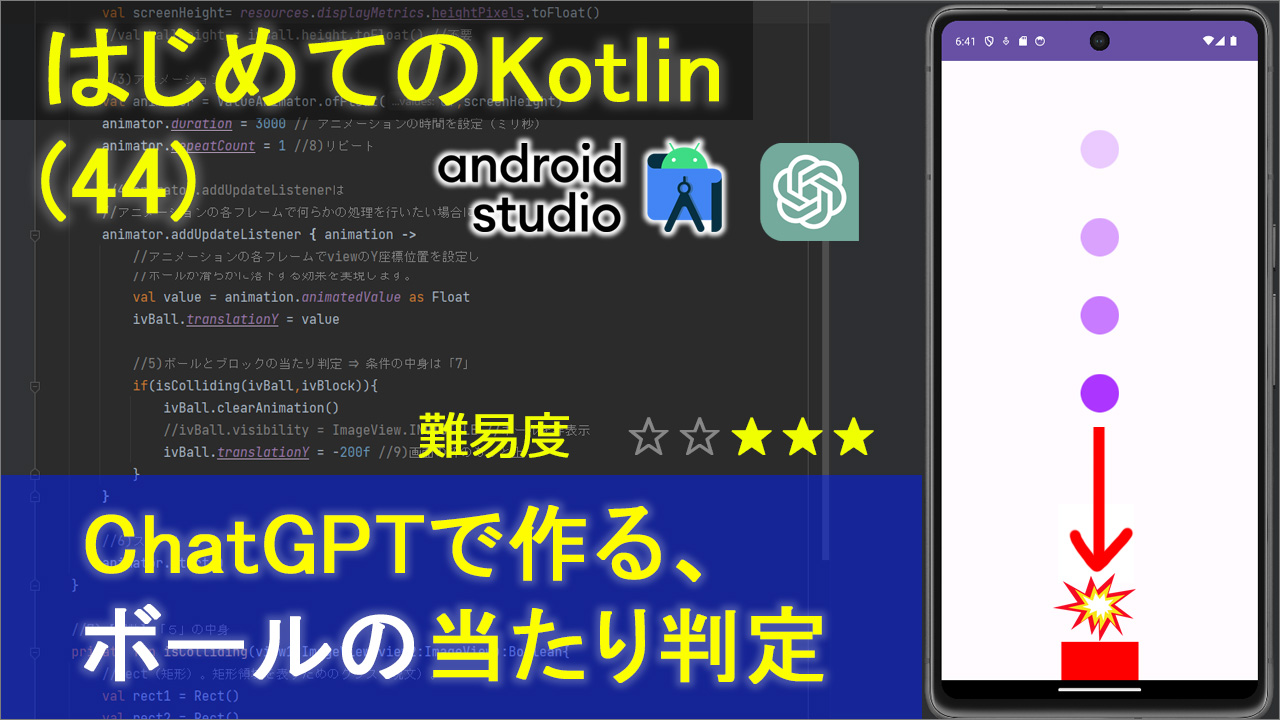
プログラミング言語kotlinで、chatGPTを使いながら、ボールが上から落ちてきて
●ブロックに当たったら、ボールが消えて・・・。。。
●ブロックに当たらなかったら、ボールは画面の下まで落ちる・・・。。。
というプログラミング、簡単なアプリを作っていきたいと思います。
※事前にあわせてご覧ください
【はじめてのKotlinプログラミング(42)】ChatGPTで作る、ブロック移動プログラム
【はじめてのKotlinプログラミング(43)】ChatGPTで作る、ボール落下のプログラム
動画
▼画像(ご自由にお使いください)


▼目次
02:35 レイアウト(xml)
06:20 chat GPT
09:55 chat GPT(仕切り直し)
13:25 [1]viewの取得
14:30 [2]画面の高さ
16:30 [3]アニメーションの作成
19:00 [4]UpdateListener
23:20 [5-6]ボール非表示とスタート
26:35 [7]関数
38:40 エミュレータで確認
41:55 [8]リピート
44:40 [9]非表示の修正
48:30 おまけ(微調整)
コード
▼activity_main.xml
<?xml version="1.0" encoding="utf-8"?>
<androidx.constraintlayout.widget.ConstraintLayout xmlns:android="http://schemas.android.com/apk/res/android"
    xmlns:app="http://schemas.android.com/apk/res-auto"
    xmlns:tools="http://schemas.android.com/tools"
    android:layout_width="match_parent"
    android:layout_height="match_parent"
    tools:context=".MainActivity">


    <ImageView
        android:id="@+id/ivBall"
        android:layout_width="wrap_content"
        android:layout_height="wrap_content"
        app:layout_constraintEnd_toEndOf="parent"
        app:layout_constraintStart_toStartOf="parent"
        app:layout_constraintTop_toTopOf="parent"
        app:srcCompat="@drawable/ball" />

    <ImageView
        android:id="@+id/ivBlock"
        android:layout_width="wrap_content"
        android:layout_height="wrap_content"
        app:layout_constraintBottom_toBottomOf="parent"
        app:layout_constraintEnd_toEndOf="parent"
        app:layout_constraintStart_toStartOf="parent"
        app:srcCompat="@drawable/block" />
</androidx.constraintlayout.widget.ConstraintLayout>
▼MainActivity.kt
package com.example.ballblockapp

import android.animation.ValueAnimator
import android.graphics.Rect
import androidx.appcompat.app.AppCompatActivity
import android.os.Bundle
import android.widget.ImageView

class MainActivity : AppCompatActivity() {
    override fun onCreate(savedInstanceState: Bundle?) {
        super.onCreate(savedInstanceState)
        setContentView(R.layout.activity_main)

        //1)viewの取得
        val ivBall :ImageView = findViewById(R.id.ivBall)
        val ivBlock :ImageView = findViewById(R.id.ivBlock)

        //2)画面の高さとボールの高さ
        val screenHeight= resources.displayMetrics.heightPixels.toFloat()
        //val ballHeight = ivBall.height.toFloat() //不要

        //3)アニメーション
        val animator = ValueAnimator.ofFloat(0f,screenHeight)
        animator.duration = 3000 // アニメーションの時間を設定(ミリ秒)
        animator.repeatCount = 1 //8)リピート

        //4)animator.addUpdateListenerは
        //アニメーションの各フレームで何らかの処理を行いたい場合に使う
        animator.addUpdateListener { animation ->
            //アニメーションの各フレームでviewのY座標位置を設定し
            //valueはボールが画面内でどの位置にあるかを示す浮動小数点として更新される。
            //ボールが滑らかに落下する効果を実現します。
            val value = animation.animatedValue as Float
            ivBall.translationY = value

            //5)ボールとブロックの当たり判定 ⇒ 条件の中身は「7」
            if(isColliding(ivBall,ivBlock)){
                ivBall.clearAnimation()
                //ivBall.visibility = ImageView.INVISIBLE //ボールを非表示
                ivBall.translationY = -200f //9)画面の枠のもっと上
            }
        }

        //6)スタート
        animator.start()
    }

    //7)【関数】「5」の中身
    private fun isColliding(view1:ImageView,view2:ImageView):Boolean{
        //Rect(矩形)。矩形領域を表すためのクラス(呪文)。
        val rect1 = Rect()
        val rect2 = Rect()

        view1.getHitRect(rect1) //ivBallヒット領域(タッチ可能な領域)の取得
        view2.getHitRect(rect2) //ivBlockヒット領域(タッチ可能な領域)の取得

        //衝突したときの値を返す
        return rect1.intersect(rect2)
    }
}